How to enable the latest anti-spoofing OSNMA service on your Septentrio receiver
Contents

GPS/GNSS signals travel 20’000 kilometers from the satellite until your GNSS receiver. It is not easy, but is technically possible, to artificially generate a fake GNSS signal from a ground station, that can confuse your GNSS receiver to think it’s elsewhere. You might have read in the news lately that this is increasingly a problem on GNSS devices installed on aircrafts.
To improve transmission reliability and give capabilities to the GNSS receiver to detect fake signals, the European GNSS system Galileo has developed the OSNMA anti-spoofing service, enabling secure end-to-end communication from Galileo satellites to OSNMA-enabled receivers. Explained in short, both satellite and GPS receiver exchange a password or “key” that the GNSS receiver can use to determine if the signal is genuine or fake. If a satellite signal is flagged as spoofed, it will be excluded from the positioning calculation. At the moment of writing this tutorial, note that this feature is still undergoing testing by Galileo and Septentrio, so the results may not yet be fully reliable.
This step-by-step tutorial will guide you through retrieving and inserting keys into the Septentrio receiver to enable the OSNMA service. The process can be repeated on receivers powered by mosaic-H and mosaic-X5 modules with the latest firmware.
At the moment of writing this tutorial, note that this feature is still undergoing testing by Galileo and Septentrio, so the results may not yet be fully reliable.
Required Hardware:
How to test anti-spoofing protection using OSNMA on Septentrio receiver
Firstly, retrieve the keys of OSNMA service.
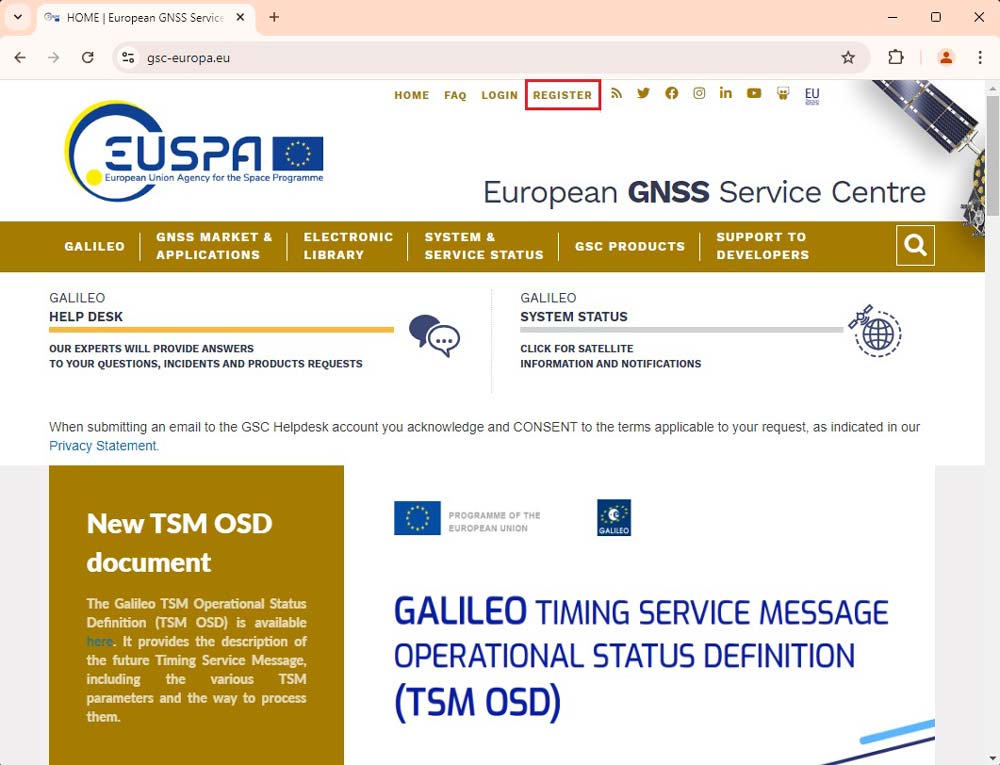
- Register to your account on the EUSPA website.
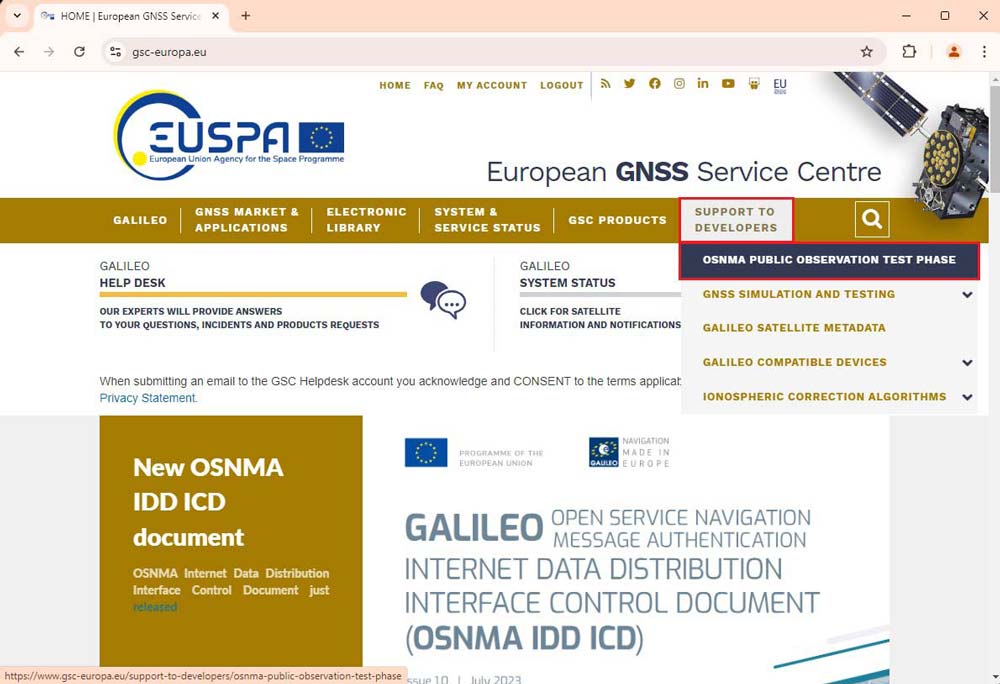
- Go to SUPPORT TO DEVELOPERS–>OSNMA PUBLIC OBSERVATION TEST PHASE. Fill in the form to become an OSNMA Public Observation Test Phase participant.
You will get an email confirming your registration to be able to download the key. Note that the confirmation may take around 1 week.
- After receiving the confirmation go to:
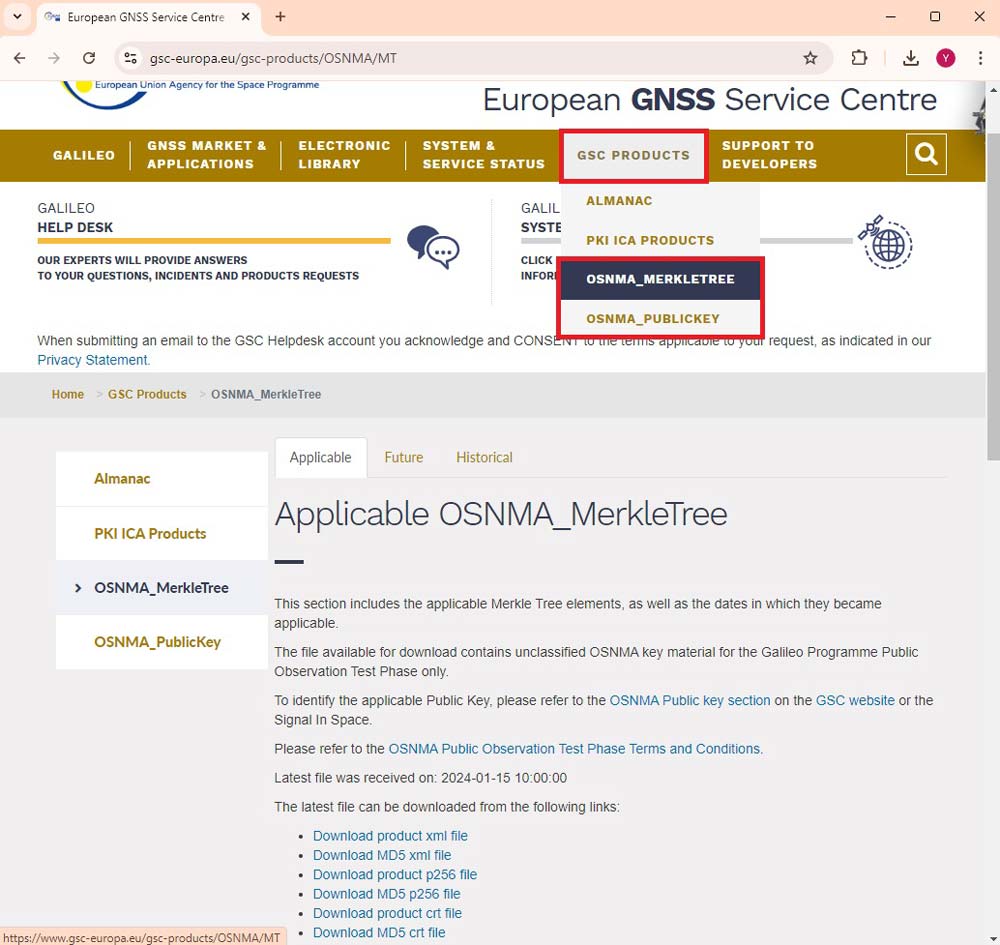
- GSC Products–>OSNMA_PublicKey for the public key. Download the product crt file.
- GSC Products–>OSNMA_MerkleTree for the Merkle Tree root. Download the product xml file.
- After downloading the keys, you need to convert them into a format accepted by the receivers. For the public key, you can use OpenSSL, which is typically available on most Linux distributions. Windows users can download and install OpenSSL Light.To convert the key, use the command:
openssl x509 -in "C:\Users\User\Downloads\OSNMA_PublicKey_20240115100000_newPKID_1.crt" -pubkey -noout -out key.pub
- Remember to replace the folder and key name with your own ones getting from step 3.
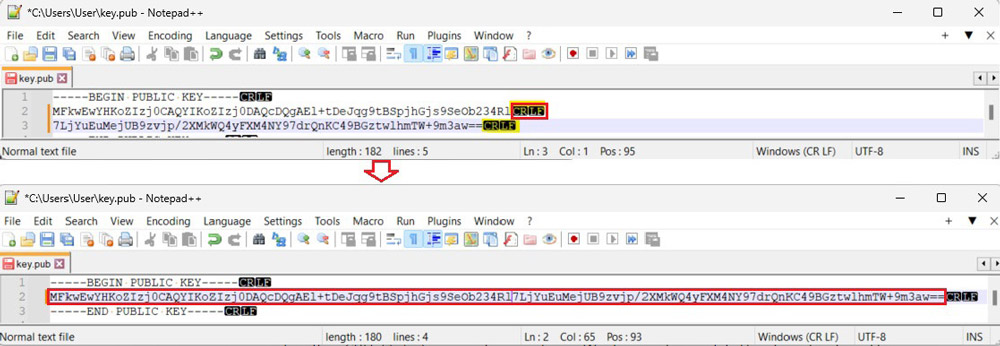
- Use command type key.pub to check the key or open the key.pub file with a txt reader. It will show as image. Copy the key, we will use it later.
type key.pub
- Please note that there will be a CRLF (carriage return and line feed) between the first and second lines of the key. Be sure to remove this extra space, otherwise, you may encounter an error message when using the key.
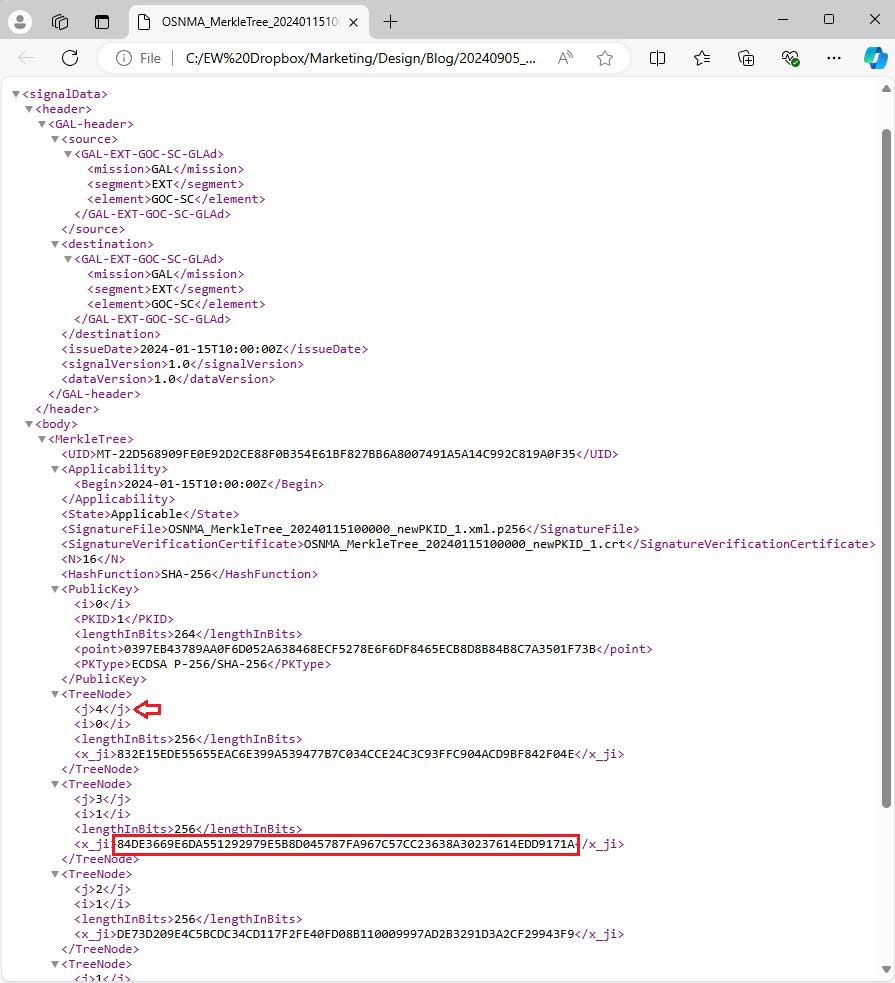
- Open the Merkle Tree “.xml” file in a browser by right click and Open with. We’ll need to find the “x_ji” parameter of “TreeNode j4” (highlighted below).
Secondly, configure the OSNMA public key and Merkle Tree root to a Septentrio receiver.
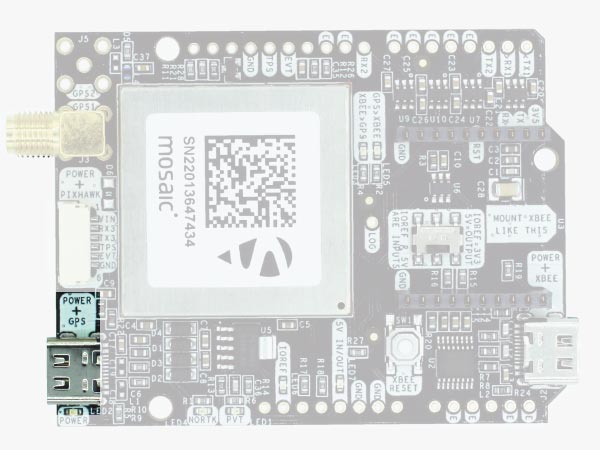
- Connect the receiver to your computer via the USB port labeled with POWER+GPS.
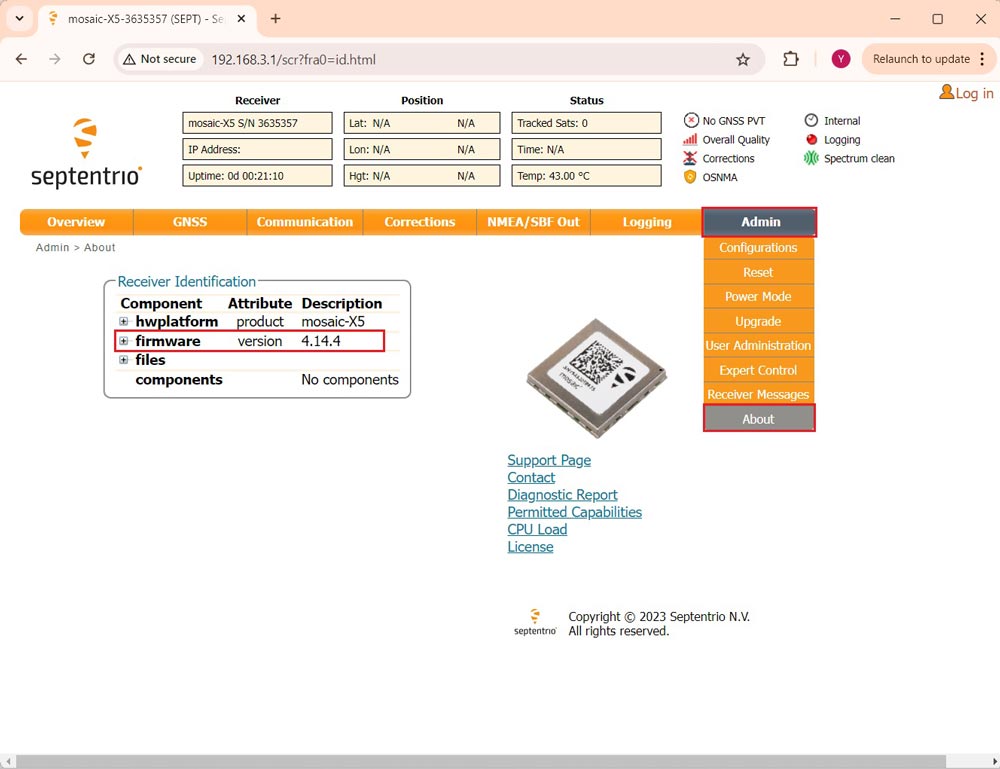
- Open a web browser and type in 192.168.3.1 to open the Septentrio web interface. Go to Admin–>About to check the firmware of your receiver.
If your firmware is 4.14.4 or later, you can go directly to the step 11.
- If your firmware is older than 4.14.4, you will need to update it. Follow the video tutorial to update your firmware
- Connect the antenna to your receiver and place it in open air to test the functionality.
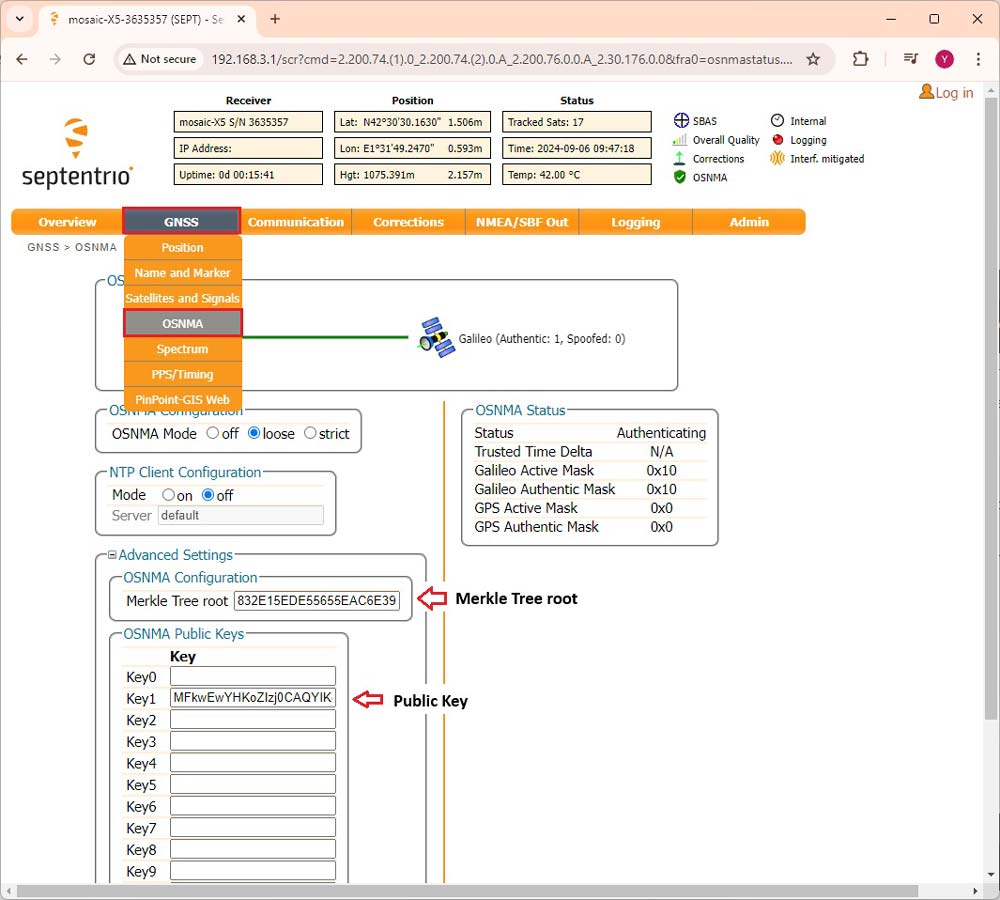
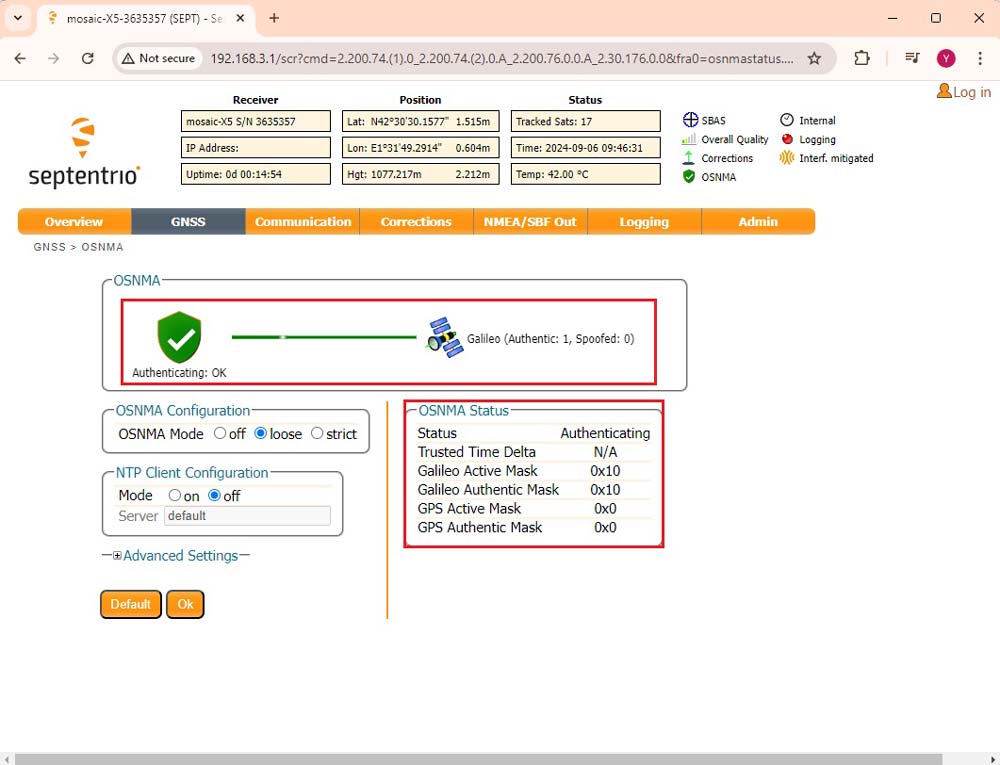
- Go to GNSS–>OSNMA. At OSNMA Configuration choose loose, NTP Client Configuration choose off.
Check Advanced Settings.
At Merkle Tree root paste the Merkle Tree root you get from step 7.
At Key1, paste the key you get from step 6.
Click Ok and save configuration, so you don’t need to enter the key next time.
- In a few minutes, the Status will change from initializing to Authenticating. You can see the number of Galileo satellites being spoofed.
If you want to do this tutorial, we have all the products in stock and ready to be shipped:
 and
and 
